js에서 간단한 에디터를 만드는 방법을 예제를 통해 정리한다.
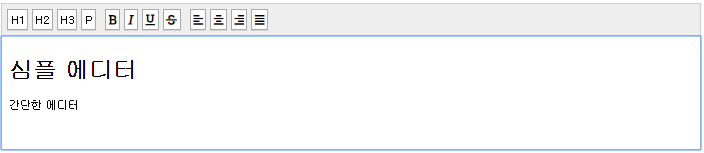
실행결과
12개의 기능이 있는 간단한 에디터가 생성된다.
예제 소스코드
example.html
<!DOCTYPE html>
<html>
<head>
  <meta charset="UTF-8">
  <link rel="stylesheet" href="https://use.fontawesome.com/releases/v5.5.0/css/all.css"> <!-- A -->
  <link rel="stylesheet" href="style.css">
  <title>간단한 텍스트 에디터 만들기 예제</title>
</head>
<body>
  <div class="toolbar"> <!-- B -->
    <a href="" data-command='h1'>H1</a>
    <a href="" data-command='h2'>H2</a>
    <a href="" data-command='h3'>H3</a>
    <a href="" data-command='p' style="margin-right: 8px;">P</a>

    <a href="" data-command='bold'>
      <i class='fa fa-bold'></i>
    </a>
    <a href="" data-command='italic'>
      <i class='fa fa-italic'></i>
    </a>
    <a href="" data-command='underline'>
      <i class='fa fa-underline'></i>
    </a>
    <a href="" data-command='strikeThrough'style="margin-right: 8px;">
      <i class='fa fa-strikethrough'></i>
    </a>

    <a href="" data-command='justifyLeft'>
      <i class='fa fa-align-left'></i>
    </a>
    <a href="" data-command='justifyCenter'>
      <i class='fa fa-align-center'></i>
    </a>
    <a href="" data-command='justifyRight'>
      <i class='fa fa-align-right'></i>
    </a>
    <a href="" data-command='justifyFull' style="margin-right: 8px;">
      <i class='fa fa-align-justify'></i>
    </a>
  </div>
  <div class='editor' contenteditable="true"> <!-- contenteditable이 true면 편집가능 -->
    <h1>심플 에디터</h1>
    <p>간단한 에디터</p>
  </div>
  <script>
    document.querySelectorAll('.toolbar a') // C
      .forEach(aEl => aEl.addEventListener('click', function (e) {
        e.preventDefault();
        const command = aEl.dataset.command;

        if (command == 'h1' || command == 'h2' || command == 'h3' || command == 'p') {
          document.execCommand('formatBlock', false, command);
        }
        else {
          document.execCommand(command);
        }
        }));
      })
  </script>
</body>
</html>
(style.css 생략)
설명
위에 주석친 부분을 문단단위로 정리한다.

[A] 폰트 어썸 css를 적용한다. html에서 'fa fa-bold'처럼 css클래스 이름을 부여하면 적용할 수 있다.

[B] 상단에 있는 툴바를 작성한다. data-command를 사용해
data-command='h1'처럼 텍스트에 전달할 명령을 작성할 수 있다.

[C] 툴바 영역의 모든 버튼 선택하고 각각의 버튼에 클릭 이벤트리스너를 등록한다.
이벤트 발생 시 수행동작은 기본 행위를 방지한다.
그리고 data-command 속성값을 dataset 객체의 command 속성을 통해 가져온다.
가져온 command속성값은 클릭한 기능을 적용하기 위해 execComand()메소드에 전달한다.
[ execCommand(명령이름, 기본 사용자 UI를 보여주는 여부, 특정 명령에 필요한 값) ]
command값이 'h1', 'h2', 'h3', 'p'인 경우는 다음 공식 문서에 따라 'formatBlock' 명령을 전달해주어야한다.
공식문서
https://developer.mozilla.org/en-US/docs/Web/API/Document/execCommand#Commands
'formatBlock', 'fontSize' 같은 다양한 명령은 위 링크에서 확인할 수 있다.
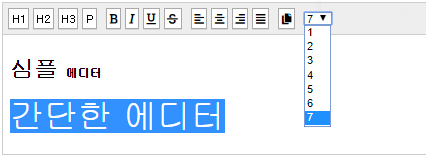
기능 추가
공부할 겸 카피기능과 텍스트크기를 지정하는 기능 2개를 더 추가해보았다.
이렇게 하려면 html과 script에 아래 코드를 추가해주면 된다.
html
<a href="" data-command='copy' style="margin-right: 8px;">
  <i class='fa fa-copy'></i>
</a>

<select name="job" id='test'>
  <option value="1">1</option>
  <option value="2">2</option>
  <option value="3">3</option>
  <option value="4">4</option>
  <option value="5">5</option>
  <option value="6">6</option>
  <option value="7">7</option>
</select>
script
document.getElementById('test').addEventListener('change', function (e) {
  document.execCommand('fontSize', false, e.target.value);
}